
BALSA is specifically designed for sharing of extensively analyzed neuroimaging data organized into scene files generated in Connectome Workbench wb_view and typically associated with a study that is being prepared for publication or is already published.
Before you can create a study and upload data to BALSA you must have a BALSA account, login to that account, and agree to the BALSA Data Submission Terms and Conditions. Refresh the page to confirm the “I Agree” button changes to “Agreed”.
The first stage of submitting your study to BALSA involves analyzing your data and creating scenes in wb_view, a part of the Connectome Workbench platform. Be sure to use wb_view v1.3 or higher, but for best performance, get the latest release of Connectome Workbench here.
In a typical workflow, users (study owners):
- Load analyzed data in wb_view with an appropriate set of surface or volume structures
- Create one or more figures for publication using wb_view (each as a separate scene), saving them to a scene file with a description (figure legend) as they are created
- Upload the scene file(s) and all associated data files into BALSA via the built-in uploader in wb_view
- Add study metadata (BALSA release date, project description, publication information, authors, etc.)
- Submit the study for curation
- Revise study in response to curator recommendations. The study is approved for release on a user-specified release date.
- Add links to the BALSA study and scenes to your manuscript, preferably including figure-specific scene URLs to each relevant figure legend as well as a link to the overall study in the Methods and/or Discussion.
When the study is uploaded, unique URLs are assigned to the study as a whole and to each scene individually that may be linked to from your manuscript to direct readers to your data on BALSA. When you make changes, reupload scene files to update your study to a new version (while preserving the URLs, so they don’t require editing).
In BALSA, you may add collaborators as owners or reviewers as viewers of the study to share data as you prepare your manuscript or while it is under review.
After submission, your study will be in Submitted status (in curation) and reviewed by BALSA curators who will test the dataset, send you suggestions, and help you resolve any issues. Once everything is in order, a curator will approve your study for release (Approved status). Upon your chosen release date, your study will moved to Public status, making it publicly viewable and downloadable from BALSA.
Create and save your scenes in wb_view (click ![]() to open the Scenes Window). Help info on creating scenes
is available by clicking
to open the Scenes Window). Help info on creating scenes
is available by clicking ![]() and 1) searching for Create a New Scene File and 2) in the table of contents,
clicking Best Practices Guides > Annotations and Scenes Best Practices.
and 1) searching for Create a New Scene File and 2) in the table of contents,
clicking Best Practices Guides > Annotations and Scenes Best Practices.
We recommend generating scenes that match as closely as possible the actual layout, title, and description of figures in your manuscript. This includes using wb_view ‘annotations’ to label figures (see Help: Annotations). If possible, it is most efficient to create your figures for publication using wb_view, saving them as scenes as you work on them, rather than recreating figures made using other programs. For an example, see the Glasser et al. study “A multimodal parcellation of human cerebral cortex”.
We strongly encourage the following “best practices” when generating scenes for your study:
- Create a single scene file (with multiple scenes) for all of your main text figures.
- Supplementary figures or additional related scenes can be uploaded as one or more separate scene files to the same study, using the same BALSA Study ID.
- If possible, create one scene per figure. The Tile Tabs function of wb_view can help in creating multipanel figures.
- Name each scene by its figure name (including number). If more than one scene must be used for a single figure, indicate panel A, B, C, etc. in the scene name.
- Use the figure legend as the scene description: In the wb_view ‘Scenes’ Window, select “Replace” for the corresponding scene. Copy the figure legend from the manuscript text and paste it into the Description field. Then press OK. Once all figure legends are pasted into the scene Description fields, press Save to save the scene file.
- Regarding directory structure, keep the data files to be included in any given scene file as localized as is feasible, i.e., not in widely distributed directories that require going up and down many levels.
- View the current directory structure for all files used in your scene file, select “Show Files and Folders” in the Scenes window.
- The Hierarchy tab shows files in each folder and subfolder relative to the scene file’s Base Path (see Directory Tips).
- The List tab shows all data file paths relative to the scene file.
- See the Directory Tips tab for additional recommendations on user-friendly ways to organize your data, particularly if the overall directory structure seems unwieldy.
- Consider using BALSA to share draft scene files with co-authors, especially if they are not at the same institution. In that case, you may wish to upload draft scene files to BALSA while still in the process of generating figures and adding relevant co-authors as Study Owners in BALSA (see Metadata tab). That enables them to access and edit the study well in advance of its going public.
If you haven’t yet created a BALSA account and agreed to BALSA Data Submission Terms and Conditions, follow the instructions under the Get Started tab.
In the Scenes Window in wb_view, click the Upload button, then enter your BALSA Username and Password, and click Login (logging into a BALSA submitter account is required before you enter a Study Title).

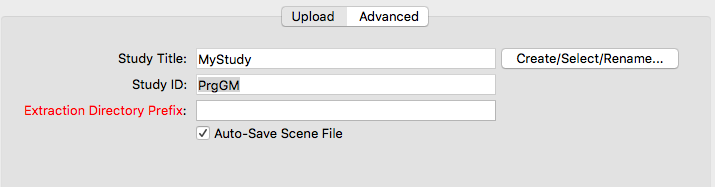
Click Create/Select/ Rename (right side of Study Title), then click Create New Study, enter the title of the study (generally the manuscript title), and click OK. If you are adding a new scene file to an existing BALSA study, choose the title of the study you wish to upload to from the list of your existing studies, then click OK.
A BALSA Study ID will be generated for your dataset and autofilled in the Study ID field. In addition, your scene file will be automatically assigned a sceneFile_ID and each of the scenes within your scene file will be assigned a unique scene_ID provided by BALSA. (Note: the scene ID’s are not visible in the scene file unless you close and re-open the scene file or use the ‘Replace’ option for individual scenes.) Each of these three categories of BALSA ID’s serve a useful purpose! This is important if you follow our recommended ‘best practice’ of adding scene-specific URL’s to your published figure legends.
Extraction Directory Prefix
This is the prefix for the ‘Extraction Directory’ that your dataset will unzip into when users download and extract your dataset; a suffix (_<StudyID>) will be automatically appended to this prefix by BALSA at the time of download. Adding the study-specific suffix protects against inadvertently unzipping a dataset into an identically named directory on the investigator’s own computer, which could be very disruptive!
The default Extraction Directory prefix is the name of the lowest level directory in your dataset’s base path (the lowest level path that contains your scene file and all files referenced by your scene file). If this directory name makes good sense for a publicly released dataset, then stick with the default. However, a different name may be preferable. For example, if the current directory is personalized or cryptic, it is advisable to provide a succinct, project-specific directory name (e.g., “Glasser_et_al_2016_HCP_MMP1.0_StudyData” is the Extraction Directory Prefix for the Glasser et al., (2016) cortical parcellation data). Importantly, the Extraction Directory Prefix can be edited at any time on the BALSA Study page.
Note: If your study will include multiple scene files that have different base directories, it is advisable to choose a higher level directory prefix that all scene files (and their associated data files) will have in common. This entails options in the Scene: Upload Scene File to BALSA: Advanced tab that are explained under the Directory Tips tab.
Click Upload. The Auto-Save Scene File is checked by default and will save the scene file with BALSA metadata (BALSAstudy_ID, sceneFile_ID, and scene_IDs) before uploading. A status bar will show the progress of your upload to BALSA.
When you make changes to scenes after initial upload, save and upload the scene file again to update your study in BALSA (See Revise Scenes tab). Each time you upload, a new version of the Study will be created with a unique version ID. You can navigate to all versions from the Study page All Versions dropdown. The most recently modified version will be listed at the top of the dropdown and displayed for you on the study page.
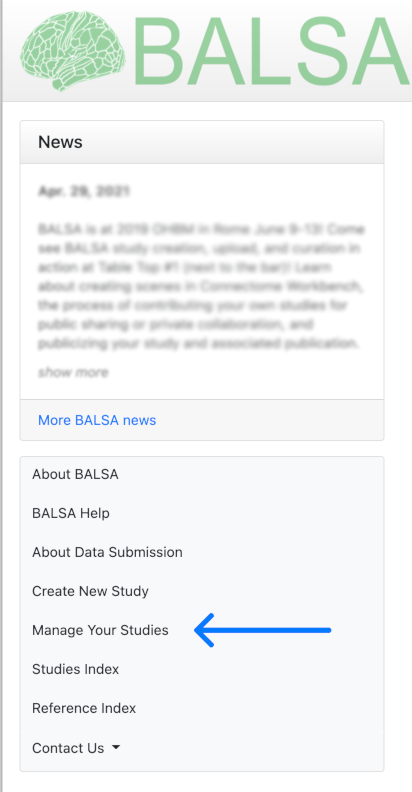
Login to BALSA with your username and password. Once you are logged in, a panel of options will appear on the left. Click on Manage Your Studies.
Click on the Title of your study, which is in NONPUBLIC status. Your Study’s page will open with thumbnail images of the scenes you uploaded.
Editing Study Metadata
Click Edit to enter ‘metadata’ about your dataset. Descriptions of the tabs and fields for the Edit Study page is available here.
In the Study Details tab, the Extraction Directory Prefix, the name of the directory that your dataset will unzip into when users download and extract your dataset, is populated by what was in that field in wb_view at upload (see Upload Data tab), but can be edited at any time in BALSA, even after a study has been made public (see also Revise Scenes and Directory Tips tabs). We recommend choosing a prefix that is a project-specific and succinct directory name.
The dataset Description should include any additional information beyond the publication abstract that you would like users to see displayed in BALSA (e.g. README information important for interpreting results displayed in scenes, links to relevant data shared outside of BALSA).
For the Species, select all that apply.
In the Publication tab, use the search fields to find journal titles and institution names, click on your selection and click the Use/Add Selected button. Depending on your preferences and the state of your manuscript, you may enter information on a preprint version (a manuscript released on a platform such as BioRxiv), the final published version, or both. For the preprint DOI, the default is to display it on the Study page, but you can elect to disable this display once the journal article is published.
In the Ownership and Access tab, you may set the owner and viewers associated with the dataset by entering individual BALSA or usernames (see "Get Started" tab). Owners may upload files to the study and edit metadata in BALSA, viewers are able to view and download your study dataset before public release. The ability to edit and download enables collaboration with owner colleagues on uploading/editing a shared BALSA dataset submission. The viewer setting allows you to “preshare” your dataset with select users, such as reviewers.
Data Access Terms
Also on the Ownership and Access tab, indicate whether investigators will be required to agree to a set of Data Access Terms (DAT) before downloading the data from your study. It is incumbent on each investigator to determine whether sharing of human data for their project meets any requirements or constraints of their home institutional IRB (or equivalent entity at a non-U.S. institution).
A DAT can apply to any study, but is especially important in relation to human studies. You may upload a new DAT for your project and home institution or select from a list of previously uploaded DATs if they apply to your study. For example, for a study that uses open access HCP data, simply select the “WU-Minn HCP Consortium Open Access Data Use Terms” in the Data Access Terms field.
Click the blue Save Changes button at the top of the page to save changes to Edit Study, then press Return to Study.
Editing Scene Files and Individual Scenes Metadata
Click the Edit Scenes button at the top of the Study page. Here you can add BALSA tags and descriptions for your scene file(s) and individual scenes.
Tags are bits of additional information (metadata) attached to files and scenes to assist users searching or filtering for specific datasets and scenes. Tags are optional, but they will help other users find your dataset within BALSA when using the Filtering option on the home page.
When files are uploaded to BALSA, they are automatically scanned for keywords indicating which tags may be appropriate. Scenes and files in your dataset should be reviewed to verify that the tags attached to them are correct and to add additional tags as appropriate.
Specific tags may be added to all scenes in your study (add tags without clicking scene file name), all scenes in a particular scene file (click the scene file name, then add tags), to individual scenes (click the scene file name, then click the scene name, then add tags), or any combination of these.
To add tags, click on the arrows to the left of appropriate tags on the right. Click the Add tags button to add the tags to all scenes in your study.
Currently, removing tags can only be done at the individual scene level. To remove tags, click on the ‘X’ to the right of each tag you wish to remove in the current list.
At the scene file level on this page, you can add a Scene File Description for each scene file to aid users in distinguishing multiple scene files in your dataset.
At the individual scene level on this page, you can add a BALSA Scene Title to be displayed on the Study dataset page and on the homepage in the scene carousel for your study. This is an alternative scene title for display specifically in BALSA that distinguishes the scene from other scenes in the dataset or in BALSA generally and is useful if scene names in scene file are not particularly descriptive, e.g., Fig 1, Fig 2, etc., or are too long for display in the homepage scene carousel.
Note: BALSA Scene Titles are only shown in BALSA, i.e., changes to scene titles in BALSA will not propagate back to the scene names in the uploaded scenes/scene file that will be downloaded and viewed by users in wb_view. A best practice is to instead make any critical edits to scene names and descriptions in wb_view and reupload the scene file to BALSA (see Revising and re-uploading scene files tab), which will then automatically update this information in BALSA.
Click the Save Changes button at the top of the page to write the changes made at all levels to the dataset.
When you are done editing your dataset, click Submit for Curation. This will create a SUBMITTED version of your dataset that is locked for editing until it is reviewed by BALSA curators. You may still make changes to a working version of the dataset that will save as a new, NONPUBLIC version while the SUBMITTED version is curated. When your dataset is reviewed by BALSA curators, they may suggest changes or additions and will return your dataset to a new, editable NONPUBLIC version until any issues are resolved.
After submission, a BALSA Curator will contact you to help prepare your dataset for release.
BALSA Curation, Versioning, and Release steps:
- Study owner submits study for curation; study goes from NONPUBLIC to SUBMITTED version.
- Curators identify any issues for review and send back comments to study owner(s), curators return the study to an editable NONPUBLIC version.
- Study owner(s) resolve issues with the help of Curators. If scenes are modified and scene files are reuploaded, a new NONPUBLIC study version (with unique ID) will be created.
- Study owner(s) resubmit study for curation, returning it to SUBMITTED status.
- Study goes through final review and is approved for release by Curators.
- Study is released on release date set by owners on the BALSA publication tab, curated study becomes the PUBLIC version.
Adding a Study ID
To obtain the study URL to add to your manuscript, open a web browser, login to BALSA, select Manage Your Studies, find and then click on your study.
On your study's page, copy your browser’s current URL (e.g., https://balsa.wustl.edu/study/show/XXXX, where ‘XXXX’ is a 4-character string that matches the Study ID at the top of your BALSA Study page). Place this URL into your paper in an appropriate place with appropriate wording. Note that this URL will not work for those who are not study owners/viewers until the study is PUBLIC, after the BALSA curators approve it, and not until after the release date. As such, the phrasing in the draft sent to reviewers should explain this, and be changed before final publication (e.g., submitted manuscript might read “Data from many of the figures in this study will (upon manuscript acceptance) be freely available at balsa.wustl.edu/study/show/XXXX”).
Adding Scene ID’s to Figure Legends
Besides providing a link to the overall Study ID, it is useful to provide ‘scene-specific’ URLs at the end of relevant figure legends. Doing this alerts readers that they are one click away from viewing a preview of the specific scene associated with each figure.
On your BALSA Study page, scroll down to the list of scenes; copy the ’scene_id’ appended to each scene name (e.g., ‘gM71’ from: (Index: 0, ID: gM71); then paste this scene_id into the end of your figure legend associated with that scene so that it now ends with: “Data at http://balsa.wustl.edu/XXXX”. Alternatively, you can click on each scene hotlink, then copy and paste the full URL from the browser into your document. Note: Be sure to use the individual ‘scene_id’, which is stable even if you update the scene, and not the 4-character scene file ID appended to the scene file name. This is because the scene file ID will change if any of its scenes are modified and the scene file is re-uploaded to BALSA. See also ‘Revise Scenes’ tab.
Continue this process until all scene-associated figure legends end with an appropriate URL. If a given figure is associated with multiple scenes, indicate appropriately, e.g., “Data at http://balsa.wustl.edu/XXXX and http://balsa.wustl.edu/YYYY”, etc.
As figures and figure legends in a manuscript are modified during revisions among coauthors and during the review process, your scenes will likely require revisions. BALSA and wb_view are designed for smooth handling of revisions and updates to scene files (so that’s not a good reason to postpone the initial upload!).
A scene file that has been revised by changes to one or more existing scenes (including re-ordering the sequence) can simply be re-uploaded to BALSA, keeping the metadata that was added at the first upload intact. Each time you upload a scene file, a new NONPUBLIC version of the Study will be created. You can navigate to all versions from the Study page. Re-uploading will change the study version and scene file ID, but the scene_ID will remain the same. If additional scenes are added to a scene file, they will be assigned new scene_IDs that will be incorporated into the scene file, simply by saving it when prompted during the upload process.
Note: For this re-upload process to work seamlessly, the revised scene file’s name and path must not change. Otherwise, the file will be treated as a new (separate) scene file upload and you will need to delete the old version from your BALSA study. During curation, we often suggest that the scene file be moved to make it easier for users to find it in the directory structure. Moving the file will change the scene file's path causing the potential for duplicate uploads. In this case, first remove the original scene file and its supporting files from BALSA using the Files tab, then upload the updated scene file from its new location.
Organizing Data for End Users
Scene files in Connectome Workbench can point to many distinct files in any number of directories, because the scene file includes the directory structure for each data file relative to the scene file’s own directory. This provides valuable flexibility, but it means that care should be taken in managing the directory structure for scene files and data files to be shared via BALSA and used by others.
Before uploading your scene file to BALSA (and preferably relatively early in the scene generation process) we recommend evaluating your scene file’s current directory structure using “Show Files and Folders” in the Scenes window. Aim to organize the data you plan to use in your scene into a single or small group of directories that are as localized as is feasible, i.e., not in widely distributed directories that require going up and down many levels, and named to help the user navigate your dataset. Save your scene file in a local directory close to the associated data to keep your overall directory structure relatively flat. The directory structure of all files contained in the scene file relative to the base directory (see below) will be preserved in your dataset when it is downloaded from BALSA and extracted by other users.
Having the constituent files are in many different directories at many levels of directory structure is potentially confusing for end users. For some studies, a good solution is to put the scene file in a main directory along with the other data files and perhaps various subdirectories. For other studies having multiple major directories representing different aspects of the analysis, it may be better to put the scene file(s) in a separate ‘nearby’ directory, clearly named to direct users to the scene files there. If you need to use a more complex directory structure, use the Description metadata field in the Study Details tab to explain where to find scenes and critical files in your dataset.
Base Path
The automatically determined ‘base path’ for a scene file is the “lowest level” path that contains the scene file and all of the data files it references. It is used when creating a zip file for the scene, which is included in the process of uploading to BALSA.
The easiest way to view the base path for your scene is to select Scenes: “Show Files and Folders”. Then press the List tab to see the default “Automatic Base Path” at the top. Alternatively, press Scene: Upload, then press the Advanced tab near the middle of the Upload Scene File to BALSA popup. The automatically determined base path is reported next to the default Automatic setting. Using the Custom setting, it is possible to specify a custom base path above the automatically determined one, but this will add additional directory layers to the dataset when it is downloaded and unzipped by other users. However, if your study will contain multiple scene files that have different base directories, then it will likely be preferable to choose a higher level directory that all scene files (and their associated data files) will have in common. For this, select the Advanced tab in the Upload Scene File to BALSA window. Use Custom: Browse to choose suitable directory level.
If the lowest (farthest right) level subdirectory in Custom is not what you wish to use for the Extraction directory prefix, then select the Upload tab in the Upload Scene File to BALSA window and enter the desired Extraction directory prefix. When uploading is initiated, wb_view checks the current Extraction directory prefix in BALSA; if there is a mismatch, a popup window allows the uploader to choose which one to use.